
How to Use Xender — Complete Beginner’s Guide for Android & iPhone (2026)
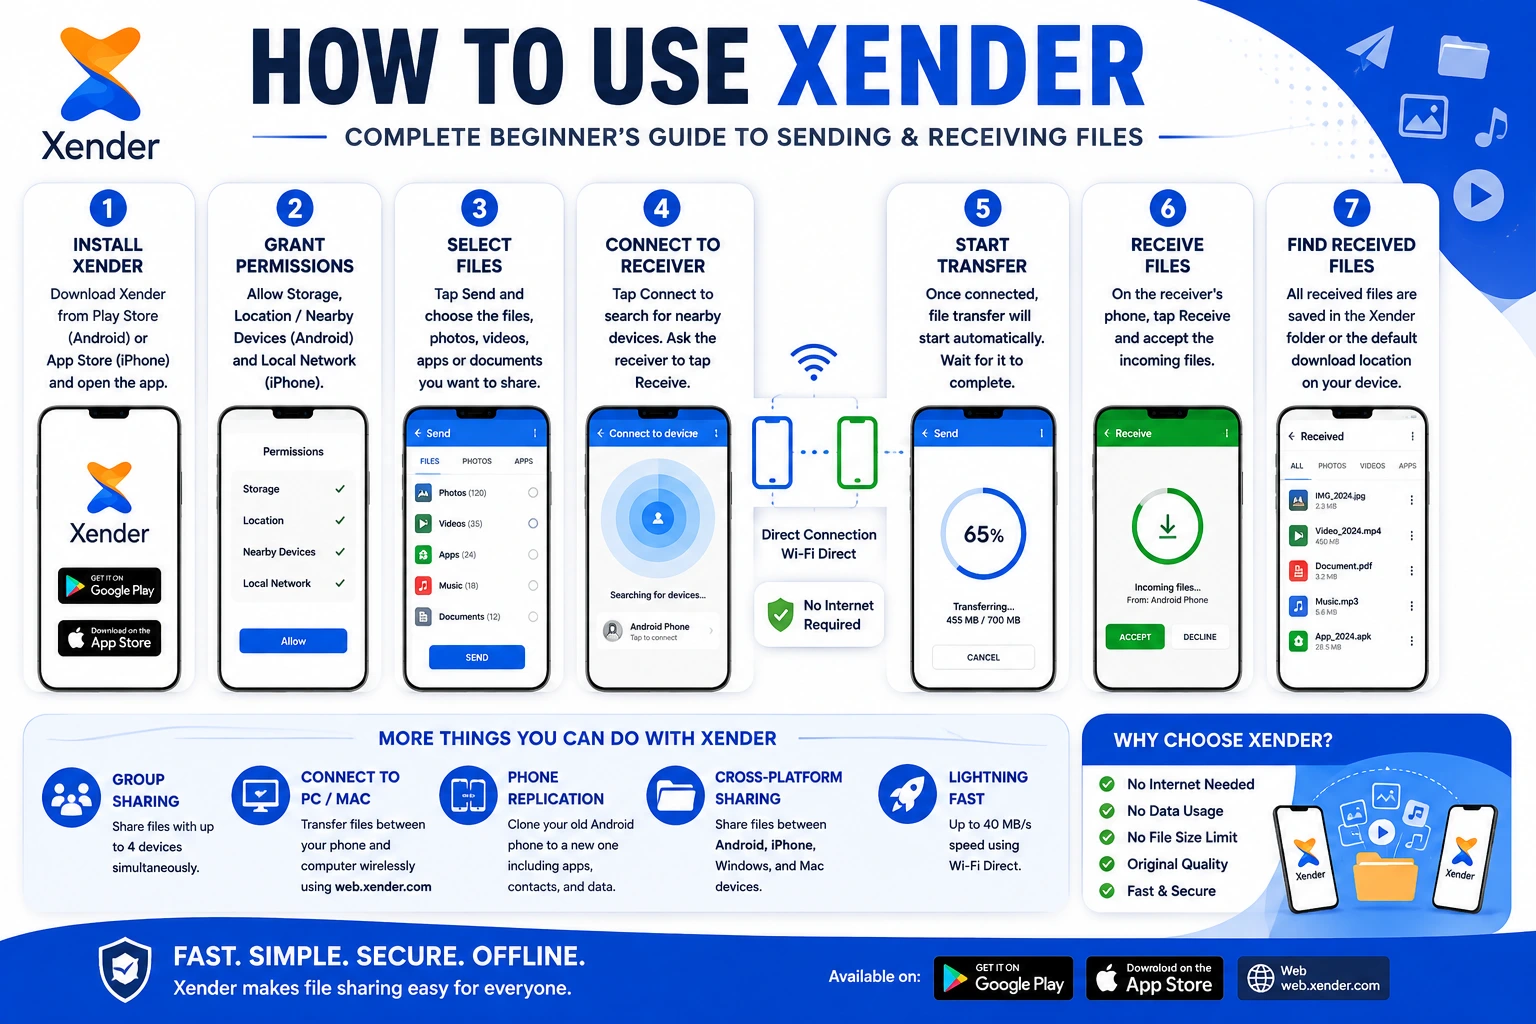
Xender does one thing and does it well: moves files from one device to another without cables, without internet, and without compressing anything along the way. The first transfer takes about two minutes to set up. After that, it becomes muscle memory.
This guide is written for people opening Xender for the first time. It covers installation, basic sending and receiving, cross-platform transfers between Android and iPhone, connecting to a PC or Mac, Group Sharing, finding received files, and fixing the problems that trip up most new users. Nothing is assumed. Every step is exact.
What Is Xender and How Does It Work?
Before touching the app, it helps to understand what is actually happening during a transfer — because it explains why certain steps are required and what to do when something goes wrong.
Xender, developed by Xender (HK) Limited and first launched in 2013, uses Wi-Fi Direct (IEEE 802.11). This wireless standard allows two devices to communicate directly without a router or internet connection. One device creates a miniature local network. The other joins it. Files transfer between them at up to 40 MB/s, roughly 100 times faster than Bluetooth.
The key point: Xender does not upload your files to any server. There is no cloud involved. The file goes from your device’s storage to the other device’s storage through a direct wireless connection. This is why it works without internet, why transfers are fast, and why nothing is compressed — there is no server-side processing that would require or justify compression.
How much faster is Xender than Bluetooth? Bluetooth 5.0 transfers at approximately 2–3 Mbps in real-world file sharing. Xender on 5 GHz Wi-Fi Direct reaches up to 40 MB/s — that is 320 Mbps. A 1 GB video takes 45 minutes over Bluetooth and about 25 seconds over Xender.
Step 1 — How to Download and Install Xender
Xender needs to be installed on every device involved in the transfer — both the sender and the receiver.
Installing Xender on Android
Option 1 — Google Play Store:
- Open the Google Play Store
- Search for Xender — File Transfer & Share
- Tap Install
- Open the app once installed
Option 2 — APK Download (for devices without Play Store):
- Visit ShareXZone.com on your phone’s browser
- Download the latest verified Xender APK
- Go to Settings → Security → Install from Unknown Sources and enable it
- Open the downloaded file from your file manager and tap Install
Permissions Xender needs on Android:
When you open Xender for the first time, it requests three permissions. Each has a specific reason:
- Storage — to read files you want to send and write files you receive
- Location — required by Android 8 and above for Wi-Fi Direct device discovery. This is not GPS tracking — Android mandates this permission for any app that scans for nearby devices wirelessly.
- Nearby Devices — required specifically on Android 12 and above for local device pairing
Grant all three. Denying any of them causes connection failures.
Installing Xender on iPhone or iPad
- Open the Apple App Store
- Search Xender: Transfer, Share Files
- Tap Get — confirm with Face ID, Touch ID, or Apple ID password
- Wait for the 90.3 MB download to complete
- Open the app
The most important first-time step on iPhone:
When Xender opens and you attempt to connect to another device, iOS shows this prompt:
“Xender Would Like to Find and Connect to Devices on Your Local Network”
Tap Allow immediately.
Why does iPhone ask this? Apple introduced the Local Network permission in iOS 14 as a privacy control. Without it, Xender cannot discover nearby Android phones, PCs, or Macs over Wi-Fi — even when everything is on the same network. If you tapped Don’t Allow by mistake, go to Settings → Privacy & Security → Local Network → Xender and toggle it on. Then close and reopen Xender.
Using Xender on PC or Mac — No Installation Needed
Xender on a computer works through a browser at web.xender.com. You do not install anything on the PC or Mac side. The phone creates the connection and the computer browser joins it. Full steps are in the PC section below.
2: Step 2 — How to Send and Receive Files Between Two Android Phones
Android-to-Android is the fastest and simplest transfer path. Both devices support Wi-Fi Direct without any restrictions, so the connection establishes in seconds.
Sending Files
On the phone that has the files:
- Open Xender
- Tap Send on the main screen
- Choose the file category:
- Photo — for images
- Video — for video files
- Music — for audio files
- File — for documents, APKs, ZIP files, and everything else
- App — to share installed apps as APK packages
- Tap the files you want to select — you can select multiple files across different categories
- Tap Send at the bottom when your selection is ready
Receiving Files
On the phone that will receive the files:
- Open Xender
- Tap Receive
- Your device name appears on the sender’s screen
- The sender taps your device name — a connection request appears on your screen
- Tap Accept
- Transfer starts automatically and shows a real-time progress bar with speed and estimated time remaining.
The entire process from opening the app to file received typically takes under 30 seconds for small files and under 2 minutes for files up to 5 GB.
Where Files Are Saved on Android
Received files go to the Xender folder in your phone’s internal storage. To find them:
- Open any file manager app
- Navigate to Internal Storage → Xender
Photos and videos also appear in the Gallery or Photos app after a short delay — Android’s media scanner indexes new files periodically.
Step 3 — How to Transfer Files Between Android and iPhone
Cross-platform transfers between Android and iPhone work differently because Apple restricts how third-party apps interact with Wi-Fi networks on iOS. Xender handles this by having one device create a local Wi-Fi hotspot that the other device joins through the standard Wi-Fi settings screen.
Why does this need Wi-Fi settings? AirDrop is built directly into iOS and uses Apple’s own protocols. Third-party apps like Xender cannot use AirDrop’s discovery method. Instead, Xender creates its own local hotspot — which is visible in the phone’s Wi-Fi list — and the other device connects to it. This adds about 30 seconds but works on any Android phone and any iPhone running iOS 10 or later.
Android Sending to iPhone
On the Android phone:
- Open Xender → tap Send
- Select the files to transfer
- Tap Connect to iPhone
- Xender creates a Wi-Fi hotspot — the name appears as Xender_XXXXXX on screen
On the iPhone:
- Go to iPhone Settings → Wi-Fi
- Find the hotspot named Xender_XXXXXX and connect to it
- Return to Xender on iPhone
- Tap Receive
- A connection request appears — tap Accept
- Transfer begins
iPhone Sending to Android
The same process with roles reversed:
On the iPhone:
- Open Xender → tap Send → select files
- Tap Connect to Android
- Xender creates a hotspot from the iPhone side
On the Android phone:
- Go to Settings → Wi-Fi
- Connect to the iPhone’s hotspot (Xender_XXXXXX)
- Open Xender → tap Receive → accept connection
Where Files Are Saved on iPhone
Files received on iPhone are saved in Xender’s internal app storage, not directly to the Camera Roll.
To access them:
- Open Xender → tap the Received tab
- All received files are listed here with their names, sizes, and timestamps
To move a photo or video to your Camera Roll:
- Tap the file → tap Save to Photos
To export a document to the Files app:
- Tap the file → tap the share icon → select Save to Files
Step 4 — How to Connect Xender to a PC or Mac
Xender connects to Windows and Mac through Xender Web Connect — a browser-based interface that requires no software installation on the computer.
How It Works
When you tap Connect to PC in the app, Xender creates a local HTTP server on your phone that your browser connects to. The QR code encodes your phone’s local IP address. Scanning it tells the browser exactly where to find your phone on the local network. Files then move directly from phone to browser — no cloud, no external server.
Phone to Windows PC — Step by Step
On your phone:
- Open Xender
- Tap the profile icon at the top left of the screen
- Tap Connect to PC
- A QR code appears — keep the screen on and do not lock the phone
On your Windows PC:
- Open Google Chrome, Microsoft Edge, or Firefox
- Navigate to web.xender.com
- Click the camera icon on the web page
- Point your phone’s QR code toward the webcam — or use your phone camera to scan the code shown on the PC screen
- Connection establishes within 3–5 seconds
Once connected:
Your phone’s storage appears organized by category: Photos, Videos, Music, Files
To download from phone to PC: Click any file or folder in the browser — it downloads to your computer’s default Downloads folder
To upload from PC to phone: Drag files from Windows Explorer directly into the browser window — they save to the Xender folder on your phone
Works on: Windows 7, 8, 10, and 11 with any modern browser.
Phone to Mac
Identical to Windows:
- Phone: Xender → profile icon → Connect to PC → QR code
- Mac: Open Safari or Chrome → go to web.xender.com → scan QR code
Compatible with macOS 10.10 (Yosemite) and all later versions, including macOS Sonoma. Works on both Intel and Apple Silicon Macs (M1, M2, M3, M4).
One common problem and its fix: If the QR code scans but nothing happens, your phone and computer are likely on different Wi-Fi networks. Check that both are connected to the same network name. Some routers broadcast separate 2.4 GHz and 5 GHz networks with different names — both devices must be on the same one.
Step 5 — How to Use Group Sharing
Group Sharing sends files to multiple people at the same time. One device hosts the group, others join, and the host sends to everyone simultaneously — each receiver gets the full file at full speed.
Creating a Group (Host Device)
- Open Xender
- Tap the Group icon at the bottom of the screen
- Tap Create Group
- Xender generates a group Wi-Fi hotspot
Joining a Group (Receiver Devices)
Android receivers:
- Open Xender → tap Group
- Tap Join Group
- The host’s group appears in the scanner — tap to connect
iPhone receivers:
- Go to Settings → Wi-Fi on iPhone
- Connect to the host’s Xender hotspot (Xender_XXXXXX)
- Return to Xender → tap Group → tap Join Group
Sending to the Group
Once all receivers appear as connected on the host’s screen:
- Tap Select Files
- Choose the files to share
- Tap Send
All connected devices receive the files simultaneously. Xender Group Sharing supports up to 4 receiving devices at once.
Does Group Sharing slow down with more receivers? Minimally. Wi-Fi Direct’s bandwidth comfortably serves 4 receivers simultaneously. Sending a 200 MB file to 4 people takes approximately 18–20 seconds total — versus 52 seconds if you send the same file individually to each person four times.
Step 6 — How to Use Phone Replication (Clone Your Phone)
Phone Replication copies everything from an old phone to a new one in a single session — apps, contacts, messages, photos, music, documents, and settings. It is the most powerful feature in Xender and the one most useful when switching devices.
Starting Phone Replication
On the old phone:
- Open Xender
- Tap the profile icon
- Tap Clone Phone or Phone Replication
- Select This is the old phone
- A QR code appears
On the new phone:
- Open Xender (install it fresh if needed)
- Tap the profile icon
- Tap Clone Phone
- Select This is the new phone
- Scan the QR code from the old phone
- Choose which categories to transfer — or select all
- Tap Start
Before You Begin — Three Things That Prevent Failure
Disable battery optimization on both phones. Android kills background processes to save battery, which pauses Phone Replication mid-transfer. Go to Settings → Battery → Battery Optimization → Xender → Don’t Optimize on both devices before starting.
Keep both screens on. A locked screen pauses the transfer on most Android devices. Set Screen Timeout to Never on both phones before starting: Settings → Display → Screen Timeout → Never. Re-enable it after.
Place both phones within 30cm of each other. Signal stability matters for long sessions. Keep them side by side throughout.
Typical duration: 15–45 minutes depending on total data size. At 40 MB/s, 10 GB transfers in approximately 4.5 minutes.
Common Problems and Exact Fixes
Xender Cannot Find the Other Device
On Android: Go to Settings → Apps → Xender → Permissions and confirm Location is set to Allow. Also check the Nearby Devices permission on Android 12 and above.
On iPhone: Go to Settings → Privacy & Security → Local Network → make sure Xender is toggled on.
On both platforms: Disable any active VPN. VPNs redirect network traffic through external servers, which bypasses the local Wi-Fi Direct connection Xender needs for discovery.
Transfer Stops Before Finishing
Screen timeout is the most common cause. Set it to Never on both devices before starting. For Android, also disable battery optimization for Xender as described in the Phone Replication section above.
web.xender.com Shows a Blank Page
Open it in an Incognito or Private browser window. If it loads there, the issue is cached data from a previous session. Clear your browser cache: Chrome → Settings → Privacy and Security → Clear Browsing Data → Cached images and files → Clear data.
Received Files Not Visible
On Android, open a file manager and navigate to Internal Storage → Xender. If files are there but not showing in the Gallery, open the Gallery app and pull down to refresh, or restart the phone.
On iPhone, open Xender and go to the Received tab. Photos need to be manually saved to Photos using the Save to Photos option.
Personal Hotspot Blocking iPhone Connection
If your iPhone’s Personal Hotspot is active, it creates a competing network that prevents Xender from establishing its own connection. Go to Settings → Personal Hotspot and turn it off before using Xender.
Built-in Features Worth Knowing About
Social Media Downloader
Xender includes a built-in downloader for videos from WhatsApp Status, Instagram Reels, Facebook, and TikTok. Copy the video link from the platform, open Xender’s downloader section, paste the link, and tap Download. The video saves directly to your device without a separate app.
MP3 Converter
Xender extracts audio from any video file stored on your device. Navigate to the MP3 Converter section inside the app, select a video file, and tap Convert. The extracted audio saves as an MP3 in your storage.
Built-in File Manager
Xender includes a file manager that lets you browse, organize, move, and delete files on your device without switching to another app. Useful for cleaning up the Xender received folder or organizing files after a bulk transfer.
High Speed Mode
Xender’s High Speed Mode switches the Wi-Fi Direct connection from 2.4 GHz to the 5 GHz band, which delivers significantly faster throughput for large files. Enable it in Xender Settings → Transfer → High Speed Mode. Both devices must support 802.11ac (Wi-Fi 5) or Wi-Fi 6. Most phones released after 2017 qualify.
Frequently Asked Questions
Q: Does Xender need internet to work?
No. Xender uses Wi-Fi Direct — a peer-to-peer connection standard that does not require internet, mobile data, or a router. Wi-Fi must be enabled on both devices because that is the physical radio Xender uses, but no internet connection is needed at any point during a transfer.
Q: Can I use Xender to transfer files from Android to iPhone?
Yes. One device creates a Wi-Fi hotspot, and the other connects to it through the standard Wi-Fi settings screen. The process takes about 30 extra seconds compared to Android-to-Android, but works on any Android phone (Android 5.0 and above) and any iPhone (iOS 10 and above).
Q: Is there a file size limit on Xender?
No. Xender transfers files of any size — a 50 GB archive and a 50 KB document transfer identically. The only practical constraint is available storage space on the receiving device.
Q: Where do received files go on Android?
Received files are saved to the Xender folder in internal storage. Open your file manager, navigate to Internal Storage → Xender, and all received files are there. Photos and videos also appear in the Gallery app after Android’s media scanner indexes them.
Q: Where do received files go on iPhone?
Files received on iPhone save to Xender’s internal app storage. Open Xender, go to the Received tab, and your files are listed there. To move a photo or video to your Camera Roll, tap it and select Save to Photos.
Q: Why does Xender need Location permission on Android?
Android requires Location permission for any app that scans for nearby wireless devices — including Wi-Fi Direct connections. This is an Android platform requirement, not a Xender-specific data collection choice. Xender does not track your physical location. Denying this permission prevents device discovery from working.
Q: How do I speed up a slow Xender transfer?
Enable High Speed Mode in Xender settings — it switches to 5 GHz Wi-Fi Direct, which is significantly faster than 2.4 GHz. Also make sure both devices are within 5 meters of each other, no other large Wi-Fi transfers are running simultaneously, and battery optimization is disabled for Xender on Android.
Q: Can Xender transfer files to a PC without installing anything on the computer?
Yes. Xender Web Connect at web.xender.com works through any modern browser — Chrome, Safari, Edge, or Firefox — with no software installation required on the PC or Mac side. Both phone and computer must be on the same Wi-Fi network. Xender vs Telegram
Xender’s learning curve is genuinely short. The first transfer between two Android phones takes under a minute once both devices have the app. Cross-platform to iPhone adds a hotspot step that takes 30 seconds. PC connection via Web Connect takes about 15 seconds after the first time.
The features worth exploring after the basics — Phone Replication, Group Sharing, High Speed Mode — each have their own dedicated guides on ShareXZone.com with deeper coverage of every scenario and fix.